WP Super Cache Plugin Settings (Configure) Kaise Kare
WP Super Cache Plugin se apne wordpress blog ka speed badhaye. Blog/website ke liye subse impotent hota hai Speed optimization, khas karke jab hamara blog WordPress platform par hota hai.
Cache plugins ki madad se aap apne wordpress website ki loading speed badha sakte hai. WordPress site ka speed up karne ke liye cache plugin use karna bahut jaruri impotent hai, take aapke blog ka pages fast load ho sake.
Koi bhi visitor slow loading website ko pasand nahi karte hai, or khas karke google, yahoo, bing, jaise search engine to low speed site ko search result me jaldi show hi nahi karta hai.
Waise wordpress platform par aapko bahut sare caching plugins mil jayenge free and premium. Par iske liye 2 best plugins hai, WP super cache, or w3 Total cache.

WP Super Cache Plugin Kya Hai
WP super cache plugin aapki website ki Loading time ko reduce karti hai or performance ko improve karti hai. Is plugins se aapke website ki web pages ki speed bhi increase hoti hai, aur sabhi data fast open hota hai.
Jab koi visitor aapke blog par visit karta hai, to WP super cache plugin aapke blog data ko visitor ke browser me save karleta hai. yani computer ke cookies me rakh leta hai.
Aur jab bhi vo visitor aapke blog par dobara aata hai to blog ka data browser ke cookies me save hone ki wajah se, ab server par jada load nahi parega or pages open hone me jada time nahi lagega fast open hoga.
Is plugin ki madad se aap apne site ke JAVA, HTML or CSS file ko minify bhi kar sakte hai, or iske liye aapko alag se koi extra plugin install karne ki jarurat nahi padti hai. agar aap CDN ka use karte hai to iski settings bhi aap WP super cache plugin se kar sakte hai.
Ye plugins aapko kafi advanced performance settings ki feature bhi provide karti hai, jiski help se aap apne wordpress blog me advanced settings karke , web pages ki speed ko increase kar sakte hai aur website ki Loading time ko kam kar sakte hai.
- W3 Total Cache Plugin Install and Setup (Configure) Kaise Kare
- Cloudflare CDN Se Website Ki Loading Speed 200% Fast Kaise Kare
WP Super Cache Plugin Ko Install kaise kare?
Dosto aapto samjh hi gaye honge ke WP Super Cache Plugin kya hai, or iska kya kam hota hai. ab mai appko batane jara hun ke WP Super Cache Plugin ko Configure Kaise Karna hai.
WP Super Cache Plugin ki Settings karne ke liye sabse pahle aapko apne wordpress blog ke plugins section me jakar isse install karna hai, Fir uske bad WP Super Cache ko setup karna hai.
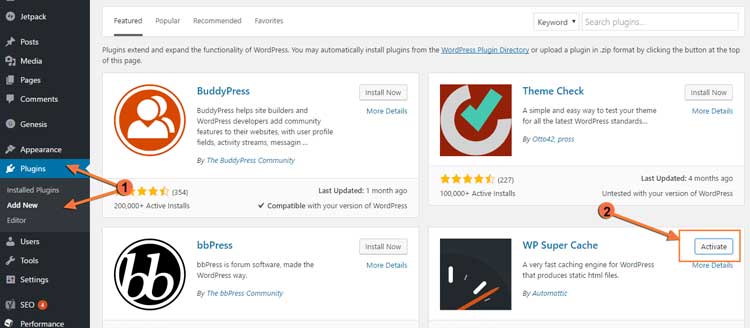
Simple aap apne wordpress dashboard me Plugins >> Add new par click kare. aapko first page par hi WP Super Cache Plugin mil jayega. Install now par click isse download karle or uske bad Activate karle.
Agar first page par show nahi ho raha hai to search box me ‘WP Super Cache’, type karke search kar sakte hai.
- WordPress Plugins Kya Hai, Aur Kaise Install Karte Hai
- WordPress Blog Me Ye 10 Jaruri Plugins Install Hona Chahye
WP Super Cache Plugin Settings (Configure) Kaise Kare
To dosto mai anke ke chalta hun ke aapne apne wordpress blog me WP Super Cache Plugin ko install kar liya hai. Ab iski settings yani isse configure karna hai. bus iske liye aapko niche bataye gaye setup ko follow karna hai.
Step 1: Caching on
- Plugin install karlene ke bad ab aap Settings par click karke,
- WP Super Cache par par click kare.
- Caching On (Recommended) ko tick mark kake.
- Update Status par click kare caching ko on kare.

Step 2: Advanced option Settings
- Ab aap Advanced par click karke option ko enable kare.
- Use PHP to serve cache files. (Recommended) ko select kare.
- Compress pages so they’re served more quickly to visitors. (Recommended),- Don’t cache pages for known users. (Recommended), – Cache hits to this website for quick access. (Recommended), – 304 Not Modified browser caching. Indicate when a page has not been modified since last requested.(Recommended), charo ko tick kare.
- Better Understanding ke liye Screenshot dekhe.

Advanced
- Mobile device support. (External plugin or theme required. See the FAQ for further details.),
- Clear all cache files when a post or page is published or updated.
- Only refresh current page when comments made.
- List the newest cached pages on this page. in sab ko ko √ tick mark kare.

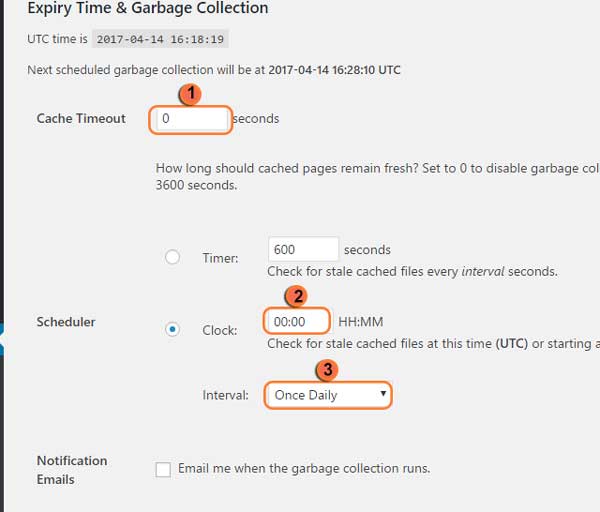
Expiry Time & Garbage Collection
- Cache Timeout: 0 seconds rakhe.
- Clock: 00:00 HH:MM
- Interval: Once Daily
Sari setting kar lene ke bad page ko scroll karke niche jaye or change Expiration click karke isse save karle.
Setup 3: Preload Setting
- Ab next setting karne ke liye preload par click kare
- Refresh preloaded cache files every 0 minutes (0 to disable, minimum 30 minutes.)
- Preload all posts.
- Uske bad upload setting par click karke isse save karle.

Is tarah se aap apne wordpress blog ko speed up karne ke liye WP Super cache plugin ko configure kar liye hai. Ab aapke blog ka speed fast ho jaye ga.
I hope ke aapko ye jankari pasand ayi ho Agar apka isse related koi sawal hai to aap coment karke puchh sakte hai.
Ye bhi padhe..


Nice post…
Sirf itna hi karne par page ki speed kam ho jayegi, ya koi aur setting b karni hai?
wow
Nice Information
Great tutoria, thanks for the infor