W3 Total Cache Plugin Install and Setup (Configure) Kaise Kare
Agar bat kare WordPress blog ke speed optimization ki, To iske liye aapke wordpress me ek caching plugin ka install hona bahut aruri hai. W3 Total Cache Plugin se apne wordpress blog ki loading speed badha sakte hai.
Koi bhi visitor slow loading website ko pasand nahi karte hai, or khas karke Google par aapki ranking nahi ki jati hai, Google Penguin Algorithm 4.0 ke hisab se ab website me seo friendly article ka hi hona important nahi hai balki web pages ki speed bhi High honi chahiye.
Waise wordpress platform par aapko bahut sare caching plugins mil jayenge free and premium bhi. Par iske liye 2 sabse popular plugins hai, W3 Total cache, or WP super cache.
WordPress blog ko optimize karne ke liye aapko bahut sare wp optimization plugins milenge, aur cloudflare par free me CDN bhi mil jaye. par wordpress optimization ke alag alag plugins ko ek ek karke install karna aur manage karna achha nahi hota hai.
W3 total cache plugin me aapko wo sari features milti hai jo aapke wp dashboard or website ko optimize karne ke liye kafi hai. Sirf is ek plugins se aap apni website ko super fast bana sakte hai aur apne blog ke performance ko increase kar sakte hai.
W3 Total Cache Plugin Kya Hai
W3 total cache plugin aapki website ki Loading time ko reduce karti hai or performance ko improve karti hai. Is plugins se aapke website ki web pages ki speed bhi increase hoti hai, aur sabhi data fast open hota hai.
Jab koi visitor aapke blog par visit karta hai, to W3 total cache plugin aapke blog data ko visitor ke browser me save karleta hai. yani browser ke cookies me rakh leta hai.
Aur jab bhi vo visitor aapke blog par dobara aata hai to blog ka data browser ke cookies me save hone ki wajah se, server par jada load nahi parta hai or pages open hone me jada time nahi lagega pages fast open hoga.
Is plugin ki madad se aap apne site ke JAVA, HTML or CSS file ko minify bhi kar sakte hai, or iske liye aapko alag se koi extra plugin install karne ki jarurat nahi padti hai. agar aap CDN ka use karte hai to iski settings bhi aap W3 total cache plugin se kar sakte hai.
Ye plugins aapko kafi advanced performance settings ki feature bhi provide karti hai, jiski help se aap apne wordpress blog me advanced settings karke , web pages ki speed ko increase kar sakte hai aur website ki Loading time ko kam kar sakte hai.
WordPress W3 total cache plugin ke 2 version hai free aur paid, Agar aap Premium yani paid version use karte hai to isme aapko kafi sare advanced feature mil jate hai. jinhe setup configer karte hi aapki website ki speed 99% faster ho jati hai aur sabhi web pages optimize ho jati hai.
Sabse achhi bat ye bhi hai ke w3 total cache plugin ke free version me bhi aapko bahut sare feature mil jate hai. jo ek normal blog ko speed optimize karne ke liye kafi hai.
- Yoast SEO Me Focus Keyword and Content Analysis Use Kaise Kare
- On-Page SEO Kya Hai ? Content Ko Perfect Optimize Kaise Kare
W3 Total Cache Plugin Ko Install Kaise Kare
WordPress website ki loading speed badhane ke aapko sabse pahle apne blog me caching plugins install karna hota hai. apne blog ko Caching karne ke liye aap chahe to or bhi bahut sare plugin use kar sake hai.
Par isme liye 2 hi plugins ko best mana jata hai. 1 W3 total cache, 2 WP super cache aap inme se jisko bhi use karna chahe kar sakte hai. But w3 total cache ko setup karna new blogger ke easy nahi hota hai.
Aap chahe to iski jagah WP super cache plugin use kar sakte hai, wp super cache plugin ko install karke configure kaise karte hai. Iske baare me mai already bata cuka hun uske liye aap ye post follow kare.
Most read. WP Super Cache Plugin ki install karke Settings Kaise Kare
Dosto apto samjh hi gaye honge ke aapke wordpress blog me ek caching plugin ka hona ketna jaruri hai. Iske liye ham W3 total cache plugin ko apne wordpress blog me install karke configure karte hai. Aapse koi galti nahi ho isliye niche bataye jarahe setup ko sahi se follow kare.
Install W3 total cache plugin in wordpress
- WordPress Dashboard >> Plugins >> Add New par visit kare.
- Search box me type w3 total cache karke find kare.
- Install new par click karke download hone de uske bad isse Activate karle.
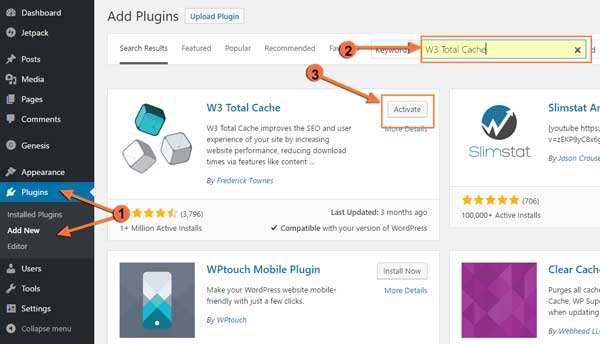
Aapka plugin install & active ho gaya hai ab aapko ishe setup karna hai, ye plugin aapko advanced feature provide karta hai isliye ise aapko manually configure karna hota hai.
W3 Total Cache Plugin Setup and Configure Kaise Kare?
W3 Total Cache me bahot sare options hote hai, jisase new blogger thoda confuse ho jate hai. Yaha mai aapko wahi settings ko setup karne ka tarika batane jaraha hu, jo sabhi hosting companies recommend karti hai.
Plugin ko install and activate karle lene ke bad aapkw wordpress dashboard me left par Performance ka option dekh sakte hai. Iski sari settings yahi se kiya jata hai.
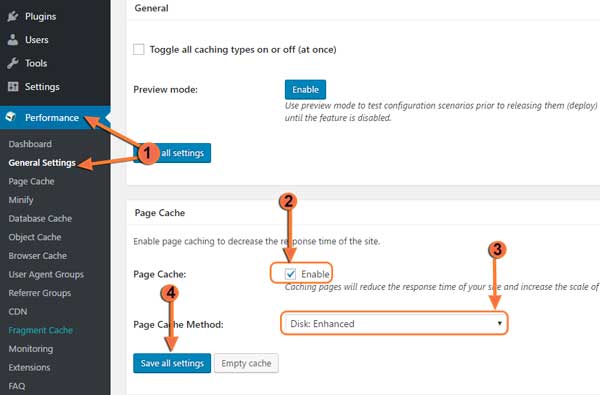
1: Page Cache Settings:
Sabse pahle aapko Page cache settings enable karna hai, iske liye aap Dashboard> Performance > General Settings par click kare.
- General settings par click karke page par visit kare.
- Page Cache: ke samne Enable ko tick kare. Jesme bataya gaya hai “Caching pages will reduce the response time of your site and increase the scale of your web server”. Matlab Page cache sites ke pages ko cache karke speed improvement karne me help karta hai.
- Page cache method: yaha Disk: Enhanced option select kare.
- Save all settings par click karke page cache ko enable kare.
2: Minify Settings
HTML files, Javascript(JS) and CSS files ko compress karke website load speed time ko reduce karta hai. Yah option ko Enable rakhana hai.
Minify aapke website ke JAVA script, CSS, or HTML files ko compress karke website load speed time ko reduce karta hai. Minify option ko Enable rakhana chahiye.
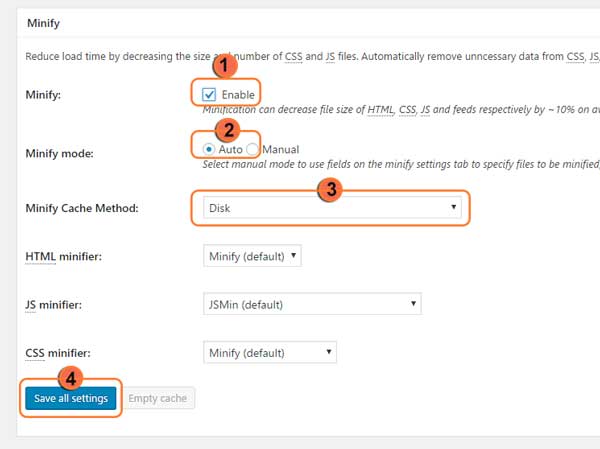
Enable karke aap Preview mode me apne website ko check kar sakte hai. kuyki kisi kisi theme code ko ye compress nahi kar pata hai aur jiske wajah se website me error aane lagta hai. Agar webpage sahi se load nahi hota hai to aap minify settings ko disable kar sakte hai.
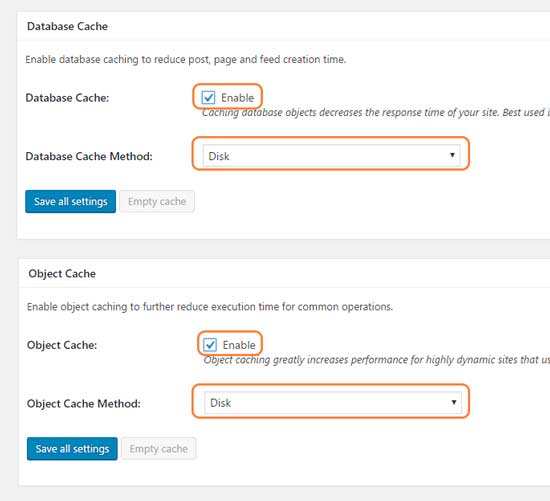
3: Database Cache and Object Cache
Agar aap apni web pages ki performance ko improve karna chahte hai to Database Cache and Object Cache ko enable kar sakte hai.
Par Bluehost or Hostgator jaise web service isse enable karne ko recommend nahi karta hai. Aur aap jis company ka bhi web hosting use karte hai, ek bar aap apne hosting provider se pata karle ke database and object cache ko enable karna recommend karti hai ya nahi.
Agar aap godaddy ka web hosting use kar rahe hai to database and object cache ko enable kar sakte hai. adhik jankari ke liye aap Aap Bluehost, Hostgator or Godaddy ka forum par pad sakte hai.
Hostgator, Bluehost and godaddy
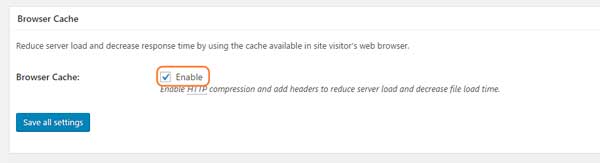
4: Browser Cache
Browser Cache setting aapke server ki Load time ko kam karti hai aur response time ko aur bhi reduce karti hai jisse ki aapki website 1 sec se bhi kam time me open ho sakti hai. Isse aapko Enable rakhna hai.
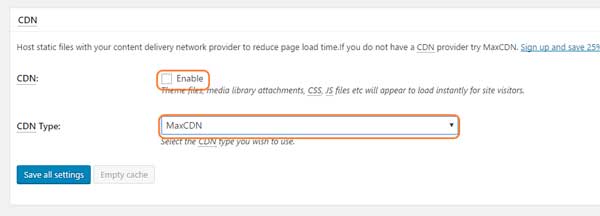
5: CDN
Aap CDN se bhi apne website ki speed ko increase kar sakte ha. Agar aapne abhi tak cloudflare par bhi cdn setup nahi kiya hai, asani se free me apne blog par CDN apply kar sakte hai. adhik jankari ke liye ye padhe.
Most read Blog Ke Liye Free me CloudFlare par CDN Setup Kaise Kare
- How to Setup Cloudflare Free HTTPS/SSL on WordPress in Hindi/Urdu
- Cloudflare CDN Se Website Ki Loading Speed 200% Fast Kaise Kare
- CDN ko Disable hi rahne de ( Ise tab hi enable kare jab ke pass cdn ki service ho) Agar aap cloudflare use karte hai to isse disable hi rahne de kuyki cloudflare ko aap direct activate kar sakte hai.
- CDN type me apne cdn provider company ka name select kare.
Baki w3 total cache plugin me cloudflare ko enable or activate kaise karna hai aap post ke last me padhenge.
Ab aapke w3 total cache plugin ki sari basic settings ho chuki hai abhi aap save all settings par click karke sare settings ko save karle.
- New Post ko Google Search Results Me Jaldi Show kaise kare [Fast Indexing]
- Website Ke Liye Professional Custom Email Address Kaise Banaye
W3 Total Cache Advanced Settings Kaise Kare
Dosto aapne apne wordpress blog me w3 total cache plugin ke bisice setting ko configure karke site ke speed ko incense kar liya hai. Ab ham iske advanced setting ke bare me jange jisse hamare blog ki performance aur bhi better hojayegi.
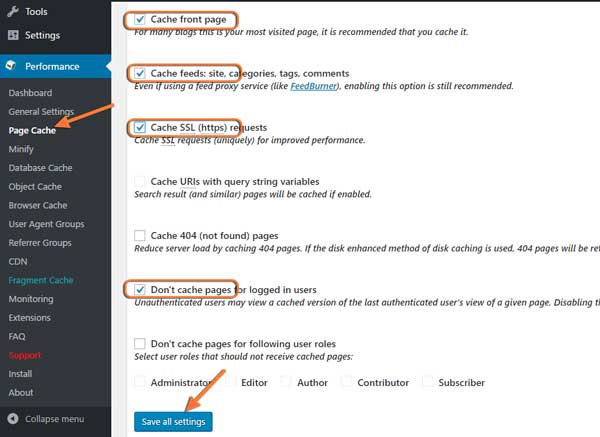
1: Page cache advanced settings
- Iske liye aap Performance > Page cache par visit kare.
- Cache front page
- Cache feeds: site, categories, tags, comments
- Cache SSL (https) requests
- Don’t cache pages for logged in users
- In 4 charo ko tick karke enable kare or uske bad save all settings par click karke isse save karle.
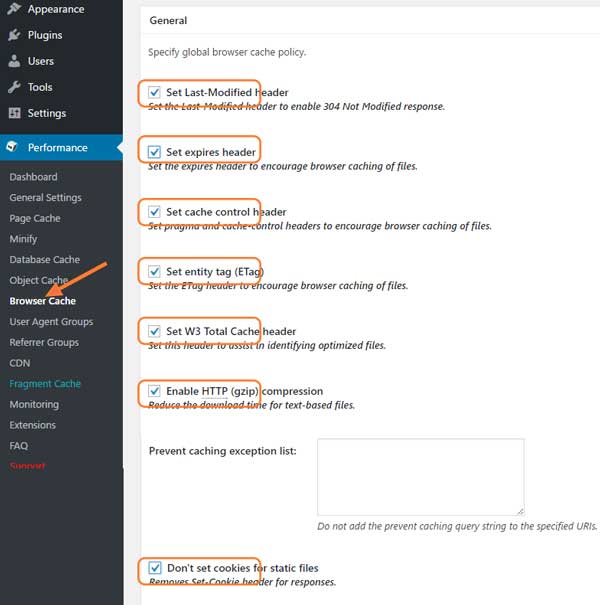
2: Browser cache advance settings
Page cache advance settings karne ke bad ab aapko browser cache ki advance settings karni hai.
- In sabko select karke save all settings par click karke isse enable kare, baki settings ko default hi rahne de.
3: Extensions options
Extension setting me aapko kuch extensions ko activate karna hai jo apke WordPress me pehle se available hai. Cloudflare, Yoast SEO, Feed burner, or jis plugins ko aap activate karna chahte hai karle.
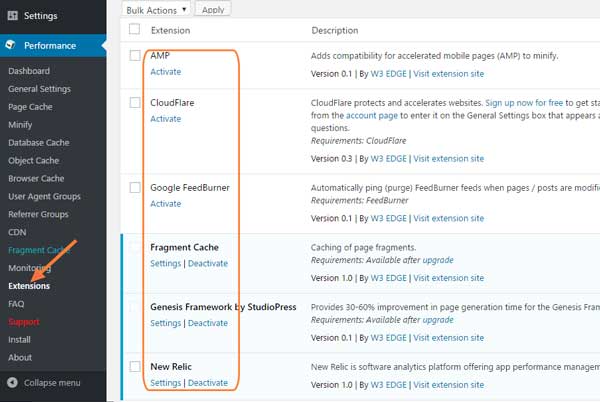
CloudFlare setting par click karke apna cloudflare email id or API key dal kar isse enable karle isse aapke wordpress blog ki speed aur bhi jada increase ho jayegi.
Is tarah se aapne apne wordpress blog W3 total cache ki puri settings karli hai. baqi kisi or settings ko change karne ki jarurat nahi paregi, bas aap w3 total cache ke default settings ko hi use kare.
Agar aap iske premium version use karenge to aapko or bhi bahut sare feature isme milenge. jisse configure karke apne blog ko aut bhi achhi tarah customize kar sakte hai.
I hope ke aapko ye jankari pasand ayi ho, or is article se apke wordpress blog ka speed optimizetion ke liye help full raha ho.
Ye bhi padhe..